Health & Fitness
How To: Make a Living Succulent Wreath
If you'd like to get creative this winter, why not make a living wreath? You can use succulents, air plants or terrarium plants. It's easy and a ton of fun!


Yes, it’s cold outside. And you can’t garden. But you want to create something, anything, that’s living. If you want to be the envy of all your friends, require something low maintenance and a barrel of fun to make, I have just the project for you!
What is it, you ask? A living succulent wreath. If you make it now, by the time spring rolls around you’ll have something fun, praiseworthy and a little quirky all wrapped into one cool package. And, it won’t break the bank. First, let me list the supplies you’ll need. That’s step one.
STEP 1- Start a shopping list. You’ll need chicken (24” wide roll) wire, wire snips, the florist wire that comes on a paddle, moss (any type or color) potting soil and plants. I used succulents, but you could use any plant that grows slowly and is colorful. Ivy, air plants, tiny Ferns or miniature Cyclamen are good choices. If you have tender hands, garden gloves are in order as well.
Find out what's happening in Town And Country-Manchesterwith free, real-time updates from Patch.
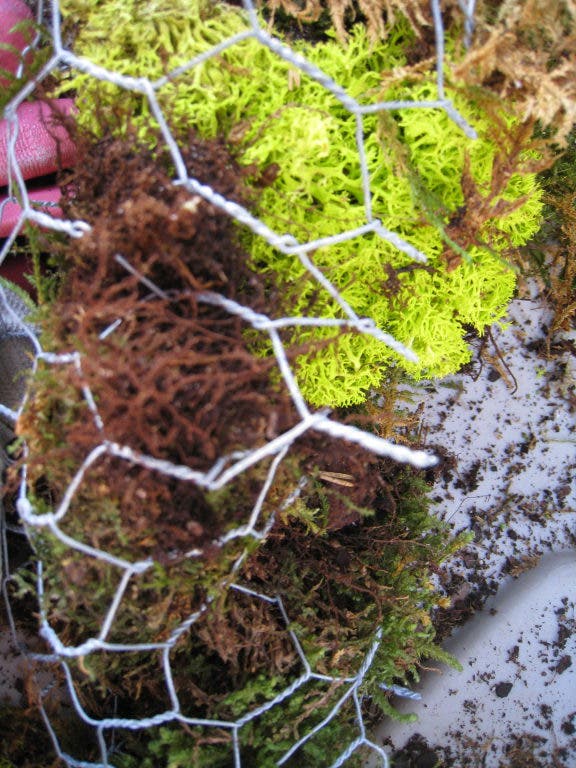
STEP 2- Cut the chicken wire into strips so you can assemble your wreath. The roll of chicken wire you need to purchase is 24” wide. I cut mine into 2- 9” wide strips with my wire cutters. Then, I used my wire (on the paddle) to join them together. I looped the wire through the holes, like I was sewing the pieces together. Do it again on the other side. Now you have a round form. Curl the outside edges towards each other, leaving about a 3’ opening. The opening will allow you to place moss and potting soil inside the form. See the attached photos to help visualize what you’re creating.
STEP 3- Begin pushing your moss inside the chicken wire form. You might find it easier to do if the moss is slightly wet but not dripping. I did. Continue working around the inside until the form is full of moss. Luckily, I still had some of the moss from Portland that my friend, Bruce sent for Christmas. I added some bright green moss that I purchased at Bowood Farms, making it a multi-color moss masterpiece!
Find out what's happening in Town And Country-Manchesterwith free, real-time updates from Patch.
STEP 4- Place potting soil inside the wreath, on top of the moss. Don’t fret if it falls through the moss. Succulents aren’t deep rooted and they’ll be OK even if the soil isn’t consistently even in the moss. Continue the whole way around, doing the best you can. It doesn’t need to be perfect in the least. It will be perfect to you…that’s all that matters!
STEP 5- Close off the inside of the wreath. You’ll notice that the cut ends of the chicken wire has little wire points sticking out. You will bend these little pieces into the other side. It’s hard to explain…see the photo on my blog. Keep turning the wire from one side into the other. You’ll figure it out fast- don’t stress about it.
STEP 6- Planting the wreath. Now, the fun officially begins! Knock your succulents out of their pots. Remove as much soil as possible. You’ll notice that they are very shallow rooted. Using a chopstick or piece of bamboo, make a hole in the form. Place the succulent in that hole. Go ahead…give it a good push. Try and get the plant level with the wreath form. Continue in this same manner of removing the plants and pushing them into the form. Play attention to the shape and color of each plant. You don’t want to have 3 or 4 of the same plants next to each other. Mixing up texture (wavy leaf) and color (grey or green leaf) gives the most interesting and creative wreath. I used about 15 plants for my wreath.
STEP 7- Finishing the wreath. Feel your wreath. Does one area seem “fuller” than the other? Grab that moss and put some more in. Using your fingers or a chopstick, press more moss into the areas that need it. Continue in this manner all around your wreath until it feels nice and solid. Finished? Now we get to water it!
STEP 8- I happened to make my wreath on one of those freakishly balmy days we’ve been having. I worked outside on my trashcan. Remember months ago when I told you that the best workplace is your trashcan because you can flip the dirty lid the back into the trash, making cleanup a breeze? And that the height of the can is perfect for potting and crafts? So, you’re finished and there’s nothing to clean up because you heeded my advice. Now, carefully, carry your wreath to a flat location to water it. If it’s cold outside, you can wet it in your bathtub. If it’s not, just place it on your driveway. Water thoroughly once and wait 15 minutes. Water it again after the 15 minutes. Now it needs to sit for a week or two to root in. I would NOT hang it yet. Mine is spending time in a guest bathtub. It won’t need much water, say every 4 or 5 days.
STEP 9- Enjoy it! If your wreath gets too heavy after you water it, you might want to run a piece of wire from the top of the frame to the bottom so it keeps its circular shape. Or, you could push thin, green bamboo stakes into the back of the wreath for support. That way the wreath won’t sag when it’s really wet. Come spring, put the wreath outside to decorate a tree, a gate, or the wall of your patio. I know that you’ll get tons of compliments on it.
Projects like this are even more fun when you get a group of friends together. Why not plan a “craft day” with your group and use this as your project? Begin with lunch, then make your wreath and toast to your fabulous creation and amazing friends with some spirited cocktails. Toast to good friends, fun projects and great times!